●Shade書捨てスクリプト
|
2010年12月 9日
|
Shade12が発売になりましたね
今まで10.5を使っていましたがアップデートして色々試してみています
ただ自分の使うスクリプトでクラッシュしたりするので移行はまだまだ先かな
ムービーを作るのに使う使い捨てスクリプトをメモ
最初にバインド設定したものの上の階層の設定を足したい場合に使うスクリプト
# coding: utf-8
#選択形状でループ
for shape_ in xshade.scene().active_shapes:
	#コントロールポイントでループ
	for i in xrange(shape_.total_number_of_control_points):
		#ポリゴンメッシュのみを処理対象に
		if shape_.type != 7 :continue
		vind_list = []
		#頂点のバインドの数を取得
		target = shape_.vertex(i)
		bind_num = target.skin.number_of_binds
		for j in xrange(bind_num):
			bind = target.skin.get_bind(j)
			vind_list.append([bind.shape,bind.weight])
		target.skin.append_bind()
		#target.skin.get_bind(0).shape = target.skin.get_bind(0).shape.parent #0番のバインドを削除する
		for j in xrange(bind_num):
			target.skin.get_bind(j+1).shape = vind_list[j][0]
			target.skin.get_bind(j+1).weight = vind_list[j][1]
	shape_.update_skin_bindings()
Shade12から追加されたプリミティブ形状を作成するスクリプト
スクリプトではカプセル形状を親子階層になったボールジョイントの位置に作成
# coding: utf-8
#xshade.scene().create_primitive_capsule(None,「プリミティブ:0,自由曲面:1,ポリゴンメッシュ:3」,True,「U方向の分割数:16」,「V方向の分割数:16」,「開始位置の中心座標」,「直径」, 1, 「終了位置の相対座標」)
scene_ = xshade.scene()
shape_ = xshade.scene().active_shape()
if shape_.type == 2 and shape_.part_type == 10:
	if shape_.parent.type == 2 and shape_.parent.part_type == 10:
		point1 = shape_.parent.ball_joint.position
		point2 = shape_.ball_joint.position
		pos_2 = map((lambda x,y:x-y),point2,point1)
		size1 = shape_.ball_joint.size
		scene_.create_primitive_capsule(None,3,True,20,16,point1,size1,1,pos_2)
座標変換とかには対応してないので ボールジョイントを回転等をさせると明後日の位置に作成されてしまいますがメモってとこで
|
●Shadeの線形状をコミスタの定規に
|
2010年9月11日
|
ComicStudioの3Dレイヤに続き定規レイヤーのデータの解析をしてみました
フォトショップのパスやShadeの線形状と同じベジェも使えるようなので
過去の自作スクリプトを活用してカメラウィンドウの表示のまま
Shadeの線形状をコミスタのレイヤーファイルとして書き出すスクリプトを
書いてみました。
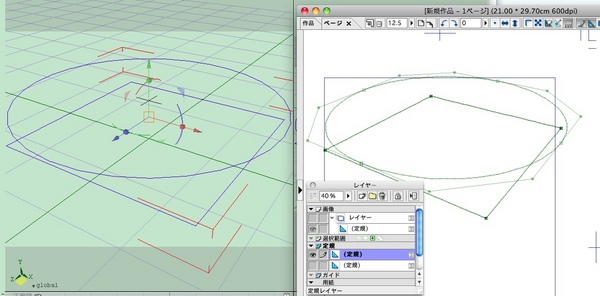
本当はもう少し使いやすいものに仕上げたかったのですが
しばらくいじっていられそうにないので 暫定版の書捨てスクリプトのまま公開
line_to_cru100911.lzh
Shadeのブラウザ上で選択している線形状が書き出し対象になります
スクリプトを実行して生成された拡張子.cruのファイルを
ComicStudioでファイル>読み込み>レイヤーファイルで読み込みます
定規のレイヤーフォルダを選択した状態だと定規レイヤーとして
画像レイヤーを選択した状態だと そのレイヤーのサブ定規として読み込まれるようです
|
●Shadeのカメラ情報をComicStudioに
|
2010年8月 8日
|
先に公開していたSketchUpのカメラをComicStudioに書き出すものに続いて
ShadeのカメラデータをComicStudioに書き出すスクリプトを作成してみました
ExportCSD.py
フリーウェアですがソースコードの再利用に関してはご一報ください
カメラデータのみの書き出しで形状書き出しは未搭載です
形状の書き出しは別記事で紹介している
LWOエクスポートスクリプトをご利用ください
このスクリプトだけでは寂しいのでもうひとつ
作りだめしている小物の中から肉まんの蒸し器をUPしました
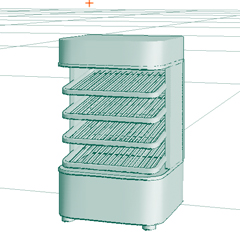
季節外れも甚だしいですが
よろしければご利用ください
|
●ランダム生成した頂点を結んで三角ポリゴンに
|
2010年4月 7日
|
後々のために計算で生成した頂点座標から
三角ポリゴンで分割した形状を作るためのテストプログラムを書き捨て
#ランダム生成した頂点を結んで三角ポリゴンに
import random #ランダム生成のモジュール
import math

#交差判定

def closs_line(pos_1_1, pos_1_2, pos_2_1, pos_2_2):

	#交差を判定するベクトルを求める

	vec_0 = [pos_1_2[0] - pos_1_1[0], pos_1_2[1] - pos_1_1[1]]

	vec_1 = [pos_2_1[0] - pos_1_1[0], pos_2_1[1] - pos_1_1[1]]

	vec_2 = [pos_2_2[0] - pos_1_1[0], pos_2_2[1] - pos_1_1[1]]

	#外積計算

	normal_1 = vec_0[0]* vec_1[1]-vec_0[1]* vec_1[0]

	normal_2 = vec_0[0]* vec_2[1]-vec_0[1]* vec_2[0]

	#法線の方向が異なる場合延長線とは交差している

	if normal_1* normal_2 < 0:

		vec_4 = [pos_2_2[0] - pos_2_1[0], pos_2_2[1] - pos_2_1[1]]

		vec_5 = [pos_1_1[0] - pos_2_1[0], pos_1_1[1] - pos_2_1[1]]

		vec_6 = [pos_1_2[0] - pos_2_1[0], pos_1_2[1] - pos_2_1[1]]

		#外積計算

		normal_1 = vec_4[0]* vec_5[1]-vec_4[1]* vec_5[0]

		normal_2 = vec_4[0]* vec_6[1]-vec_4[1]* vec_6[0]

		if normal_1* normal_2 < 0:return 1

		else:return 0

	else:return 0

#点の座標を生成

vec2_point_list = []

for i in xrange(50):

	pos_x = random.uniform(-100,100)

	pos_y = random.uniform(-100,100)

	vec2_point_list.append([pos_x, pos_y])

#print vec2_point_list

###稜線情報生成

##点列の頭から頂点同士の接続を調べる

edge_dic = {}#頂点番号:[接続先の頂点番号リスト] の辞書

for i in xrange(len(vec2_point_list)):

	edge_i = []

	pos_1_1 = vec2_point_list[i]#基準の頂点座標

	#for j in xrange(i+1,len(vec2_point_list)):

	for j in xrange(len(vec2_point_list)):

		if i == j :continue

		pos_1_2 = vec2_point_list[j]#接続確認先の頂点座標

		#引く線分の長さ

		length_1 = math.hypot(pos_1_2[0]- pos_1_1[0],pos_1_2[1]- pos_1_1[1])

		closs_flag = 0

		for k in xrange(i):

			if closs_flag != 0 :continue

			closs_list = []

			edge_k_list = edge_dic[k]

			edge_k_list2 = edge_k_list

			pos_2_1 = vec2_point_list[k] #交差する線分の頂点1

			for l in edge_k_list:

				if l == i or l == j : continue

				if l in closs_list: continue

				pos_2_2 = vec2_point_list[l]#交差する線分の頂点2

				#これまで生成された線分と新しく生成する線分の交差を判定

				#交差した線がある場合 短い線を残し長い方の稜線を削除

				closs = closs_line(pos_1_1, pos_1_2, pos_2_1, pos_2_2)

				if closs == 1:

					length_2 = math.hypot(pos_2_2[0]- pos_2_1[0],pos_2_2[1]- pos_2_1[1])

					if length_1
						closs_list.append(l)

						#print "del: %i => %i(closs %i %i)" % (k,l,i,j)

					else:closs_flag += 1

			if closs_flag == 0:

				#交差方向のエッジをリストから取り除く

				for m in closs_list:edge_k_list2.remove(m)

			edge_dic[k] = edge_k_list2

		if closs_flag == 0:

			edge_i.append(j)

	edge_i = list(set(edge_i))

	edge_dic[i] = edge_i

#Shadeのポリゴンメッシュ生成

xshade.scene().begin_creating()

xshade.scene().begin_polygon_mesh(None)

for i in vec2_point_list:

	pos = [i[0], 0, i[1]]

	xshade.scene().append_polygon_mesh_vertex(pos)

for i in xrange(len(edge_dic)):

	if edge_dic[i]:

		for j in edge_dic[i]:

			xshade.scene().append_polygon_mesh_edge(i, j)

xshade.scene().end_polygon_mesh()

xshade.scene().end_creating()
|
●LWOエクスポート/インポートスクリプト バージョンアップです
|
2009年12月29日
|
Shadeで.lwo(LightWave3D object file)をインポート/エクスポートするスクリプトをアップデートしました
Shade11への対応とUVの入出力に対応しました
通常Professionalでしか扱うことのできないlwoの形状データを扱うことができるようになります
Shade10/11のWidget形式となります
Shade10とShade11では別バイナリとなっています
ダウンロードしたファイルを解凍してできる
お使いのバージョンに合ったフォルダを開き
中にあるLWO_toolsフォルダごとShadeのWidgetsフォルダにコピーして
Shadeを再起動すれば利用可能になるかと思います
(詳しいインストール方法はShadeのマニュアルを参照してください)
http://artistside.com/?m=pc&a=page_fh_content&target_c_diary_id=15359
インポートは指定した形状のレイヤを一つのポリゴンメッシュとして作成
エクスポートはブラウザ上で選択した形状を選択形状毎に
ポリゴンメッシュに変換後それぞれをlwoとして出力します(複数形状可)
UVの入出力 テクスチャーの出力に対応しました
出力では距離UVのUV値と レイヤ1のテクスチャーデータをLWOに設定した状態で出力します
入力ではパラメタUVと距離UVの両方に同じUV値を設定します
テクスチャ出力の確認には(株)セルシスが販売しているComicStudioを利用しました
UV設定がされたポリゴンメッシュならばテクスチャー込みでコミスタ等に受け渡すことができるかと思います
|
●書き捨てスクリプト メモ
|
|
shadeの自作スクリプトのバグチェックのための書き捨てスクリプトをメモ
ポリゴンメッシュのuv値を(面id,頂点id):uv値 と出力するスクリプト
shd_shape = xshade.scene().active_shape()

for i in range(shd_shape.number_of_faces):

	vertex_id_list =shd_shape.face(i) .vertex_indices#面を構成する頂点のid

	uv_list = shd_shape.face(i).parameter_uv#パラメターUVの値を距離UVに

	for j in xrange(len(uv_list)):

		print "(" + str(i) + "," + str(vertex_id_list[j])+ ")" + str(uv_list[j])
|
●ShadeのUVをフォトショップの選択範囲に
|
2009年12月 1日
|
書捨て状態だったスクリプトを公開
MacOSXのShadeとPhotoshop環境以外では使いようがないけれど
何かの参考に
import sys

import commands

##ApleScript部分ここから##

AppleScript_="""

on run argv

	set argv_ to item 1 of argv

	set point_list to {}

	tell application "Adobe Photoshop CS3"

		--activate

		set width_ to width of current document as pixels

		set Height_ to height of current document as pixels

		if ((count word of argv_) mod 2) = 1 then

			return

		else

			repeat with i from 1 to (count word of argv_) div 2

				set a1 to (word (i * 2 - 1) in argv_ as number) * width_

				set a2 to (word (i * 2) in argv_ as number) * Height_

				set end of point_list to {a1, a2}

			end repeat

		end if

		--選択範囲を追加

		select current document region point_list  combination type extended

	end tell

end run

"""

##AppleScript部分ここまで##

##選択されている面のUVを取得

shd_shape = xshade.scene().active_shape()

f=commands.getoutput('osascript -e  \'tell application \"Adobe Photoshop CS3\" to deselect selection of current document\'')

for i in range(shd_shape.number_of_faces):

	if (shd_shape.face(i).active):

		UV_list = shd_shape.face(i).distance_uv #距離UV

		#UV_list = shd_shape.face(i).parameter_uv #パラメータUV値

		argv_ = ""

		for j in range(len(UV_list)):

			(u,v) = UV_list[j]

			argv_ = argv_ + str(u) + " " +str(v) + " "

		(u,v) = UV_list[0]

		argv_ = argv_ + str(u) + " " +str(v)

		#print argv_

		f=commands.getoutput('osascript -e \'' + AppleScript_ + '\' \''+ argv_ +'\'')

		#print f

f=commands.getoutput('osascript -e  \'tell application \"Adobe Photoshop CS3\" to activate\'')
|
●LWOエクスポート/インポートスクリプト作りました
|
2009年7月28日
|
Shadeで.lwo(LightWave3D object file)をインポート/エクスポートするスクリプトを作成しました
通常Professionalでしか扱うことのできないlwoの形状データを扱うことができるようになります
Shade10のWidget形式となります
ダウンロードしたファイルを解凍してできるLWO_toolsフォルダごと
WidgetsフォルダにコピーしてShadeを再起動すれば利用可能になるかと思います
(詳しいインストール方法はマニュアルを参照してください)
インポートは指定した形状のレイヤを一つのポリゴンメッシュとして作成
エクスポートはブラウザ上で選択した形状を選択形状毎にポリゴンメッシュに変換後それぞれをlwoとして出力します
現状では形状データ以外のUV等は無視されますが 対応していく予定です
まだまだ未完成ですがご意見ご感想等お待ちしております
http://yukimi.moemoe.gr.jp/etc/LWO_tools.lzh
|
●コントロールポイント座標の記憶/適応
|
2009年7月10日
|
形状操作する時に
コントロールポイントの座標を一時的に退避させておくのに使うスクリプトを書き捨て
スクリプトの実行内容はメモリに保持されるのでそれを利用
shape_ = xshade.scene().active_shape()

dialog1= xshade.create_dialog()

ibutton1 = dialog1.append_radio_button('/記憶/適応')

if dialog1.ask():

	ask1 = dialog1.get_value(ibutton1)

	if ask1 == 0:

		#記憶

		position_list = []

		for i in xrange(shape_.total_number_of_control_points):

			position_list.append(shape_.vertex(i).position)

	elif ask1 == 1:

		#適応

		if ((shape_.total_number_of_control_points) == len(position_list)):

			for i in xrange( len(position_list)):

				shape_.vertex(i).position = position_list[i]
おまけ
Shadeの2つあるUVの値をもう片方の値へと設定するスクリプト
shd_shape = xshade.scene().active_shape()

for i in range(shd_shape.number_of_faces):

	shd_shape.face(i).distance_uv = shd_shape.face(i).parameter_uv#パラメターUVの値を距離UVに

	#shd_shape.face(i).parameter_uv = shd_shape.face(i).distance_uv#距離UVの値をパラメターUVに
|
●Shade-Pythonメモ-日本語コード,パートの開閉について
|
2009年4月10日
|
ShadeでのPythonのデフォルトの文字コードはutf-8のようだけれど
他の文字コードを利用する時につまづいたのでメモ
#coding: utf-8

a = "てすと"

b=unicode(a,'utf-8').encode('shift-jis')
始めa.encode('shift-jis')って具合で変換できるものだと思っていたのだけれど・・・
Pythonの文字関係の処理はどうにも馴染めない
もうひとつ Shadeのパートの開閉に関するテスト
i=1

#全ての形状を調べる

while (scene.get_shape_by_ordinal(i)):

	shape = scene.get_shape_by_ordinal(i)

	if (shape.type == 2): #パート

		if (shape..disclosed):print i #パートが開いている場合,序数を出力

	i += 1
これで 閉じたパートの中に開いたパートを入れた場合でも
閉じたパート中の開いたパートも開いたパートとして認識する
ちなみに 空のパート リンクパートも開いたパートとして認識する
|
●Shade-Pythonメモ
|
2009年4月 2日
|
パートに含まれるポリゴンメッシュを一つのポリゴンにまとめた時
どうなるか試した時のテストスクリプトをメモ
#ポリゴンメッシュに変換(分割なし)

xshade.scene().convert_to_polygon_mesh()

#

shape =xshade.scene().active_shape()

for i in xrange(shape.number_of_faces):

	shape.face(i).active = 1

	xshade.scene().update_figure_window()

	#1/6秒静止(600=1秒)

	xshade.sleep(100)

	shape.face(i).active = 0
結合したものは元のOrdianl順に面の番号が再配置されるよう
|
●コミスタ用モデル
|
2008年10月 6日
|

コミスタ用のデッサン人形をネットで配布されてたデータを元に
自分好みのモデルに作り直してみたり・・・
フォーマットとしては.lws(LightWaveシーンオブジェクト)と
(手とか脚とかの)個々のパーツが.lwo なんですが
手元にはシーンデータを読み書きできる環境がないので
lwoのパーツ単位を個々に読み込んでバランスを確認しつつ
ちまちま修正・・・ めんどくさいす
とりあえず一通り形になったのでUP
http://yukimi.moemoe.gr.jp/etc/03_lady_comicstudio.lzh
コミスタのデッサン人形使ってるヒトがどれだけ居るのか分からないけど
|
●e風呂がなにか始めてた
|
2008年10月 1日
|
3DソフトのShadeを販売しているイーフロンティアが何か
SNSっぽいものを始めてた
http://artistside.com/
画像 動画 圧縮データのUPができるサイトで
UPしたデータにクリエイティブコモンズのライセンス設定ができるのが他とは違うところか?
自社製品限定というわけでもないようだし
やりたいと思っていることは分かるんだ
でも 事業としてはどうなんだろうな???
ユーザー離れが進んでいる中で コミュニティ機能のテコ入れによって活性化しようと思ったのだろうが
『これはウケル(www』と思って打った手なのか
サイト立ち上げて動かしておくだけならコストもかからないし とりあえず という手なのか
なんか こんな風↓に大々的にカウントダウンしてたあたり前者のような気がしてならない
http://shade.e-frontier.co.jp/
しかしカウントダウンが0000で止まったものを放置してあったり
そもそも このサイトがにぎわったところで自社製品の活性化につながるような手が打ってなかったり
相変わらずのちぐはぐっぷり それだけ末期症状なのだと思ってしまう
|
●プログラムのバグがああああ
|
2008年6月27日
|
前の日記にも出した3D形状変形プログラムに誤作動が発生して
苦戦中...
今週一週間何も進んでいない=□○_
どうしてもバグがとれないので愚痴書き込み
放置してもいいんだけど今後これが使えないとなると
予定が大幅に狂うし・・・
幸か不幸か仕事のデータが来るのが遅れていてよかった
っていうか 誤作動が発生しているのは一行のコードに特定できているし
ダンプさせた中間データも正常なのに なーぜーうごーかーなーい〜〜〜〜
6/29追記
コア中のコアに当たる基本ルーチンの変数名を間違えてた(笑
一回の実行で数万回実行される部分のルーチンが 添字の間違いとはいえ恐ろしい
今迄動いてたのが不思議なくらい
|
●自動モデリングですよ
|
2008年6月 4日
|
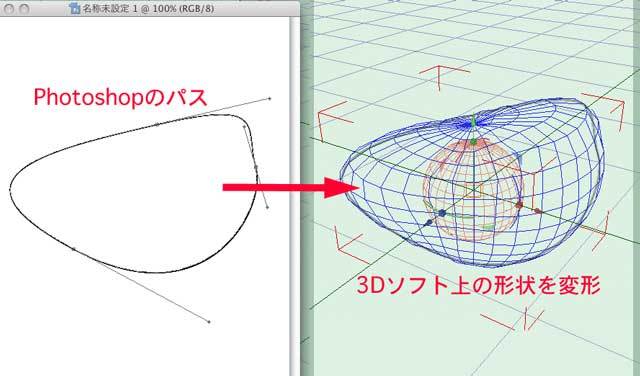
3Dソフト上のカメラ方向から見た形状を
Photoshopで作ったパスの形状に変形するスクリプトです
上の図では球体(赤)を細長い形(青)に変形してます
構想1年 ちまちまと機能を開発/テストすること3ヶ月
やっとこさ動くモノができましたよヽ(゜▽゜≡゜ワ゜)ノ
Photoshop上でのマスク切り抜き作業を
クリッピングマスクでやっているので
条件がよければ Photoshpの作業の後のモデリング作業を自動化できるってわけです
これで作業時間の短縮に・・・ なるといいなぁ
|
●ShadeのUVをイメージを作成
|
2008年5月 9日
|
# coding: utf-8
error_string = "Error: no image"
image_object_name = "UV_image"
image_size =(512,512)
paint_color =(1.0, 0.0, 0.0)

def draw_line(image_object,vec2_1,vec2_2,paint_color):

	w=vec2_2[0] - vec2_1[0]; h=vec2_2[1] - vec2_1[1]

	if w== 0:

		for i in xrange(int(abs(h))):

			x = int(vec2_1[0] );  y = int(vec2_1[1] + i*cmp(h,0))

			image_object.image.set_pixel(x,y,paint_color)

	elif abs(w) > abs(h) :

		a = h/w

		for i in  xrange(int(abs(w))):

			x = int(vec2_1[0] + i*cmp(w,0));  y = int(vec2_1[1] + i*a*cmp(w,0))

			image_object.image.set_pixel(x,y,paint_color)

	else:

		a = w/h

		for i in xrange(int(abs(h))):

			x = int(vec2_1[0] + i*a*cmp(h,0));  y = int(vec2_1[1] + i*cmp(h,0))

			image_object.image.set_pixel(x,y,paint_color)

scene = xshade.scene()

if scene.rendering.image:

	image_object = scene.create_master_image(image_object_name)

	image_object.image = xshade.create_image(image_size , 32)

else:

	xshade.show_message_box(error_string, False)

for shape_ in xshade.scene().active_shapes:

	for i in xrange(shape_.number_of_faces):

		uv_list = shape_.face(i).distance_uv

		for j in xrange(len(uv_list)):

			vec2_1= (uv_list[j-1][0] * image_size[0] , uv_list[j-1][1] * image_size[1])

			vec2_2= (uv_list[j][0] * image_size[0] , uv_list[j][1] * image_size[1])

			draw_line(image_object,vec2_1,vec2_2,paint_color)

image_object.image.create_window()
|
●ShadeWidget 基本テンプレート
|
2008年4月 4日
|
ShadeのWidgetでPythonとjavascriptが混在するのは美しくないので
外部のスクリプトファイルを実行すつように変更
<!DOCTYPE html PUBLIC "-//W3C//DTD XHTML 1.0 Strict//EN" "http://www.w3.org/TR/xhtml1/DTD/xhtml1-strict.dtd">
<html>
<head>
<meta http-equiv="content-type" content="text/html; charset=utf-8" />
<title></title>
<link href="shade_widget.css" type="text/css" />
<style type="text/css"></style>
<script src="shade_widget.js" type="text/javascript" charset="utf-8"></script>

<script type="text/javascript">
<!-- 起動時に呼び出す関数 -->
function initialize(){
	//Debug status
	document.debug = false;
	//window size parameter
	windowWidth = 300;
	windowHeight = 200;
	//Debug switch
	if (!document.debug){
	document.getElementById('debug').style.display= 'none';
	}
	//Window size set
	if (!document.debug){
	window.resizeTo( windowWidth , windowHeight );
	}
}
<!-- 絶対パスを取得 -->
function urlParser(path){
	var img=new Image();
	img.src=path;//相対パスをセット
	path=img.src;//絶対パスを保持
	img.src='#'; //実行しているhtmlのurlでロードを止める
	path = path.match(/file:\/\/(.+)/)[1];
	path = decodeURI(path);//URLエンコードされて値が得られるのでデコード
	return path;
}
<!-- 引数で与えられたPythonを実行 -->
function do_Python(f_name){
	f_path = urlParser("./") + f_name;
	py_scr = "execfile('" + f_path + "')";
	window.external.setScript(py_scr);
}
<!-- 引数で与えられたAppleScriptを実行 -->
function do_AppleScript(f_name){
	f_path = urlParser("./") + f_name;
	py_scr ="import commands\n";
	py_scr += "f=commands.getoutput('osascript \"" + f_path + "\" ')\n";
	py_scr += "print f"; //戻り値をメッセージウィンドウに表示
	window.external.setScript(py_scr);
}
</script>
</head>

 <!-- body onloadで起動時に実行する関数を呼び出す -->
 <!-- body onmouseover でWigetクリック時に関数が呼び出される -->
<body bgcolor="#cccccc" onload="javascript:initialize()">

<!-- Pythonスクリプトを呼び出す -->
<input type="button" value="do Pyrhon" onclick='do_Python("test.py");'><br>
<!-- AppleScriptを呼び出す -->
<input type="button" value="do AS" onclick='do_AppleScript("as_test.scpt");'>


</body>
</html>
|
●shadeに用意されているクラスを調べる
|
2008年3月14日
|
dirコマンドで
用意されているクラスをたどる
def roop_(base,x):

	for i in x:

		global list_

		if (str(i) not in list_):

			list_.append(str(i))

			base2 = str(base)+'.'+ str(i)

			x2=dir(eval(base2))

			print base2

			roop_(base2,x2)

list_=['xshade']

base_= 'xshade'

x = dir(eval(base_))

text = roop_(base_,x)
800行をこえた....
全部調べるのは大変そうだ
|
●Shade10キター&発売日パッチ(笑
|
2008年3月 8日
|
今仕事に3DソフトのShadeを使っているわけなのですが
(日付かわって昨日)最新版が出ました
今回はかなりの変更があることもあって 速攻アップデートを申し込み
発売日に入手しましたよ
.....が
何だこれは 形状操作が乱れる
旧バージョンで1フレーム2秒弱だったレンダリング速度が
1フレーム15秒 (wwwwwwww
さすがに真っ青になってしまいましたよ
と思ったら 夕方にアップデートパッチ発表
発売当日にパッチなんて どこかしらのエロゲメーカーですか(wwwww
とりあえず表立った不具合は治った上に
レンダリング速度も十分に速く(1フレーム1秒未満)
CPUの動作を見る感じではMacProの8コアがフルに動作しているようで
まだ 多少の不具合はあるけれど 一転使えるソフトになってました
これでしばらくはこの環境で戦えるっ!
|
●Shade-頂点 稜線に接する面を取得
|
2008年3月 6日
|
Shadeで頂点や稜線に接する面を取得するコマンドがなかったので
shape_ = xshade.scene().active_shape()

#辞書として 初期化

vertex_shered_face={}     #頂点と接する面のリスト

edge_shered_face = {}     #稜線と接する面のリスト

#頂点番号をキーとする辞書を作る

for i in range(shape_.total_number_of_control_points):vertex_shered_face[i] = []

#頂点に接する面を探す

for i in range(shape_.number_of_faces):

	for j in shape_.face(i).vertex_indices: vertex_shered_face[j].append(i)

#稜線番号をキーとする辞書を作る

for i in range(shape_.number_of_edges):

	#対象となる頂点に接している面のリストを取得

	face_list_v0 = vertex_shered_face[shape_.edge(i).v0]

	face_list_v1 = vertex_shered_face[shape_.edge(i).v1]

	edge_shered_face[i] = []

	for j in face_list_v0:

		if j in face_list_v1:edge_shered_face[i].append(j)

print edge_shered_face
|
●Python覚え書き
|
2008年3月 4日
|
クリップボードの中のPythonScriptを実行する
import commands

f=commands.getoutput('osascript -e \'return the clipboard\'')

print f #戻り値をメッセージウィンドウに出力
クリップボード内のスクリプトで commandsをインポートするとエラーになるので注意
Windowsではwin32clipboardモジュールをインポートすることでクリップボードを扱えるらしい
Shadeでムービーを作成して
ムービープレーヤーで開く
import os

import sys , commands,time

f_name = "/test.mov"

##動画を閉じる

CloseMovieAS_="""

tell application "QuickTime Player"

	repeat with i from 1 to (count documents)

		if name of document i is "test.mov" then close document i

	end repeat

end tell

"""

##動画再生ApleScript##

PlayMovieAS_="""

on run argv

tell application "QuickTime Player"

	activate

	open argv  as POSIX file

	play document 1

	set looping of document 1 to true

end tell

end run

"""

#同名の動画が開かれている場合閉じる

commands.getoutput('osascript -e \'' +CloseMovieAS_ + '\' ')

time.sleep(0.1)

#保存するパスを設定

if shade.active_document:

	f_path = os.path.dirname(shade.active_document) + f_name

else: f_path = "/Users/yukimi/Temp_items" + f_name

#シーンを取得

scene_= xshade.scene()

#アニメーションの開始フレームを取得

if scene_.animation_settings.starting_frame == -1:  start_frame = 0

else:   start_frame = scene_.animation_settings.starting_frame

#アニメーションの終了フレームを取得

if scene_.animation_settings.ending_frame == -1:

	end_frame = 300

	scene_.animation_settings.ending_frame = end_frame

else:end_frame = scene_.animation_settings.ending_frame

xshade.scene().inhibit_update()      #画面の更新を止める

start_time=time.time()

#アニメーションの作成を開始

scene_.rendering.start_animation( f_path )

for flame_ in xrange(start_frame,(end_frame +1)):

	scene_.sequence_value = flame_     #シーケンス値(フレーム)

	scene_.rendering.render()

	scene_.rendering.append_animation()

scene_.rendering.finish_animation()

end_time=time.time()

print str(end_time - start_time) + "sec"  #経過時間を表示

#シーケンス値を0位置に

scene_.sequence_value = 0

xshade.scene().allow_update()      #画面の更新を再開

#再生スクリプトを実行

commands.getoutput('osascript -e \'' + PlayMovieAS_ + '\' \''+  f_path +'\'')
|
●Blender(3Dソフト)試してみたけれど
|
2007年10月24日
|
今使っているソフトの機能等に限界を感じたので
オープンソース系の3DソフトBlenderを試してみたのだけれど,,,挫折
搭載されている機能としてはそこそこなのだけれど
操作性が独特すぎて=□○_
Macで使える統合型3Dソフト(モデリングからレンダリング、アニメーションまで備えているソフト)は
Blender(?0) Shede(使用中) LightWave(10万) MaYa(28万)
調べてみた限りではLWは今やっていることはむずかしいっぽいし
となるとMaYaかぁ....
今後予定されてる仕事のことを考えれば資金的な問題はないのだけれど
これだけ高価なモノを買う価値があるのかどうかは悩んでしまう...
(買うにしても来年になってからだし)
しかし ソフトウェアの法定耐用年数は6年なんですねぇ....
ハイエンドの3Dソフトなんてバージョンアップを追いかけたら減価償却
が終わるまでに何回アップデートすることになるやら(_△_;;;
|


